Bill of Materials for Furniture with Example
Bill of Materials for Furniture: Example, Template & Cost Guide
Ever wondered why some furniture projects go over budget or take longer than expected, while others seem perfectly streamlined from material cutting to final assembly? The secret often lies in a simple yet powerful tool: the Bill of Materials (BOM). It keeps every material, hardware, and finish aligned from concept to completion.
Quick Answer: What Is a Bill of Materials for Furniture?
With this guide, you’ll not only learn what a Bill of Materials is, but also see a fully worked furniture BOM example, understand different BOM types, and access a free downloadable furniture BOM template (Excel + PDF). Plus, you’ll get step-by-step instructions, a cost breakdown, and a QA checklist to prevent mistakes.
Download Furniture BOM (Excel + PDF)
Download the BOM Field Checklist (Printable PDF) and the Furniture BOM Template (Excel/PDF) to copy these steps with formulas baked in.
What is a Bill of Materials?
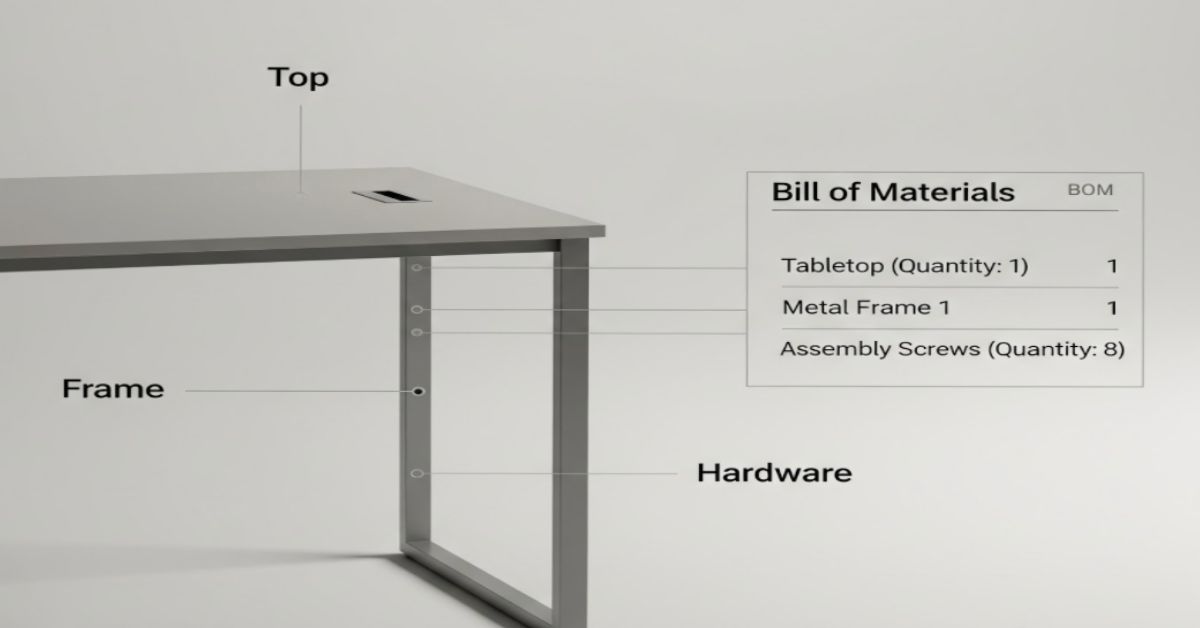
A bill of materials (BOM) for furniture is a comprehensive document that lists every component, material, and hardware piece required to manufacture a finished product. Think of it as the complete recipe for building furniture, from raw panels to the last screw.
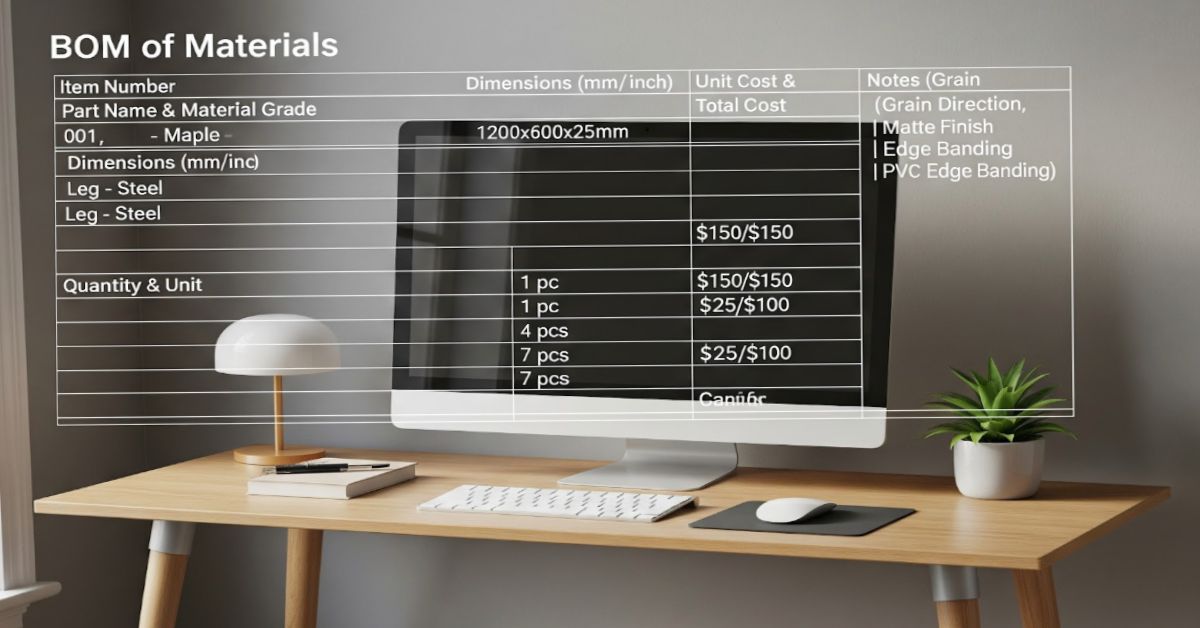
A typical furniture BOM includes:
- Item number
- Part name and material grade
- Dimensions or cut size (mm/inch)
- Quantity and unit
- Unit cost and total cost
- Notes (grain direction, finish, or edge banding)
Why does this matter? A furniture bill of materials ensures accuracy in procurement, enables precise costing, allows for repeatability in production, and reduces material waste. Without a detailed BOM, manufacturers risk missing hardware, ordering wrong quantities, or miscalculating project costs.
Bill of Materials vs Bill of Quantities vs Cut List
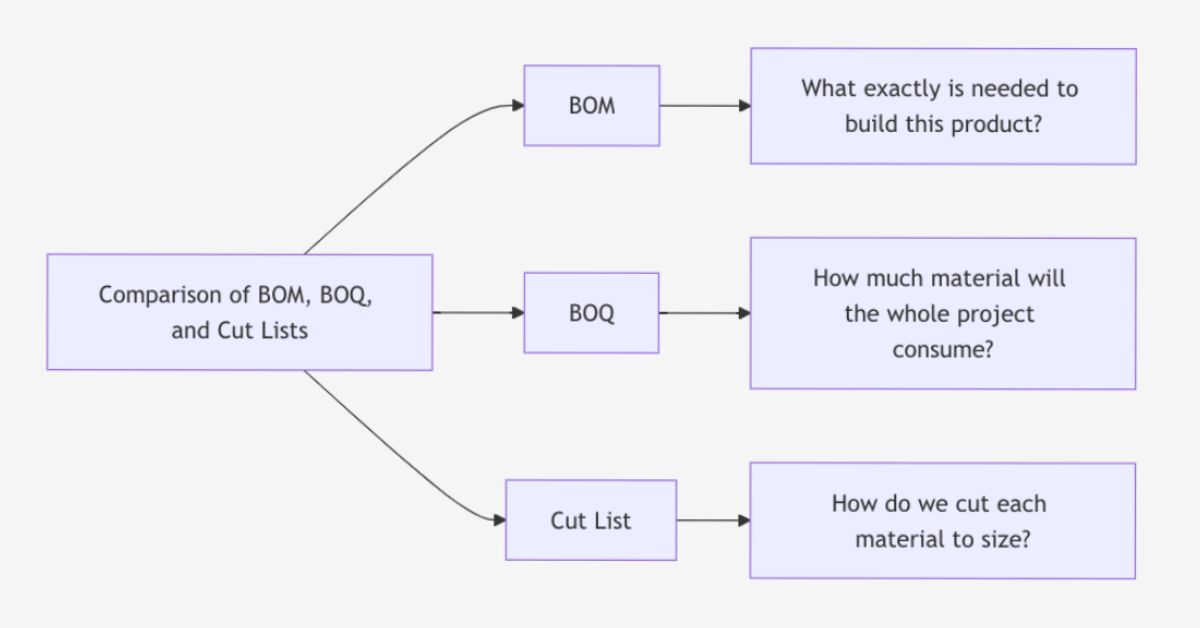
When you’re manufacturing furniture, it’s easy to confuse the Bill of Materials (BOM) with a Bill of Quantities (BOQ) or a Cut List. While these three documents may look similar at first glance, they serve very different purposes. Understanding when to use each one prevents confusion and keeps your production organized.
BOM vs BOQ vs Cut List: What's the Difference?
Comparison: BOM vs BOQ vs Cut List
| Document | Purpose | Typical Contents |
|---|---|---|
| Bill of Materials (BOM) | Complete list of all parts and costs | Components, materials, hardware, finishes, quantities, unit costs |
| Cut List | Guide for cutting panels/wood pieces | Cut sizes, grain direction, edge banding, and material codes |
| Bill of Quantities (BOQ) | Aggregated material summary for projects | Aggregated quantities by trade or material category |
Comparison of BOM, Cut List, and BOQ in Furniture Manufacturing
In furniture manufacturing, the BOM is your master document that includes everything from raw materials to the smallest washer. The cut list is a subset of the BOM. It provides precise cutting instructions for materials like wood, MDF, or plywood. Each entry lists the cut sizes, grain direction, and edge banding requirements. A bill of quantities (BOQ) is typically used in construction and large interior fit-out projects. It provides a summarized list of materials (like wood, hardware, paint, and glass) in aggregated quantities, helpful for cost estimation, tendering, and billing between contractors.
When Each is Used in Furniture Manufacturing
- Use a BOM during the design, costing, and production stages of each product (like a desk or chair).
- Use a Cut List during material preparation and fabrication.
- Use a BOQ when dealing with large-scale projects like hotel furniture or office interiors where multiple products are involved.
Pro Tip: Start With Your BOM, Then Generate Your Cut List From It
Got 3 vendors quoting 3 different things for the same spec? We'll help you standardize it. Contact us.
Types of Bill of Materials: Single-Level vs Multi-Level
When creating a bill of materials for furniture, you'll choose between two types of bill of materials structure: either a single-level BOM or a multi-level (indented) BOM based on the complexity of your product.
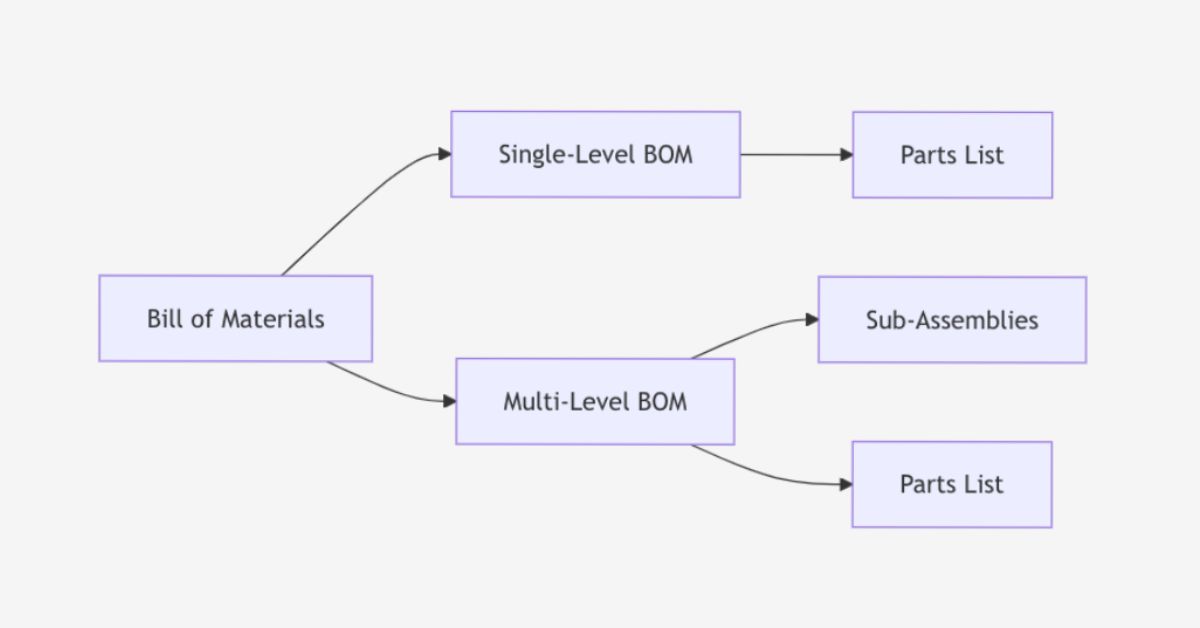
Single-Level BOM
A single-level or flat BOM lists all components in one straightforward table without hierarchical grouping. This works perfectly for simple furniture pieces like stools, basic tables, or floating shelves, where there are no sub-assemblies to track separately.
For example, if you’re building a simple coffee table, the single-level BOM might include:
- Tabletop panel
- Four wooden legs
- Screws and brackets
- Surface finish materials
This approach works well for small workshops or simple designs where assembly steps are minimal and easy to track. However, for complex furniture, this format can get confusing fast.
Multi-Level (Indented) BOM
A multi-level BOM, also known as an indented BOM, organizes components into parent assemblies and child sub-assemblies, creating a hierarchical tree structure.
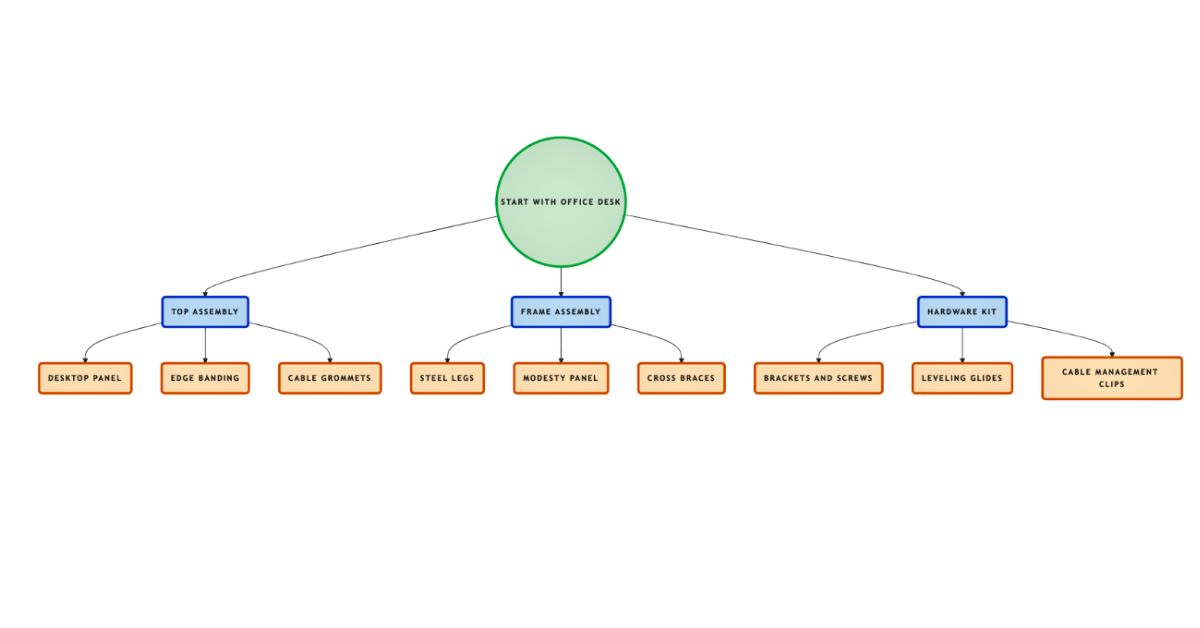
For example, an office desk might break down into: Desk (parent) → Top Assembly, Frame Assembly, Hardware Kit (children) → each with its own component lists.
This type is essential for mass production, complex assemblies, or when you need to track product variants like laminate vs veneer finish or wood vs steel frames. Multi-level BOMs are ideal for ERP/MRP integration because they allow cost roll-ups, version control, and easier substitution when components change.
Key Takeaway: When to pick which
Pro Tip:
Worked Example: Office Desk Bill of Materials
Let’s dive into a real-world furniture bill of materials example to see how it works. We’ll use a standard office desk as our reference project.
Assembly Overview
This office desk consists of four major assemblies:
- Top Assembly: Desktop panel with laminate finish, edge banding on visible edges, and cable management grommets
- Frame & Support: Steel box-section legs with powder coat finish, modesty panel for privacy and structural support
- Fasteners & Hardware: Brackets, screws, leveling glides, and mounting hardware
- Finish & Consumables: Adhesives, edge tape, wood putty, and finishing materials
Design Standards: All wood grain runs along the long dimension. Edge banding (EB-02) is applied to all visible edges. Hidden or bottom edges left raw. Laminate code L-310 (light oak texture). All metric measurements are primary; inch equivalents are shown in parentheses.
Complete Bill of Materials Table
| Item | Part/Material | Grade/Finish | Dimensions (mm/in) | Qty | Unit | Unit Cost (₹) | Total (₹) | Notes |
|---|---|---|---|---|---|---|---|---|
| 1 | Desktop panel | 25mm engineered wood, laminate L-310, edge band EB-02 | 1400×700×25 (55.1×27.6×1.0) | 1 | pc | 2,800 | 2,800 | Grain long side, 4 edges banded |
| 2 | Modesty panel | 18mm engineered wood, laminate L-310 | 1200×300×18 (47.2×11.8×0.7) | 1 | pc | 720 | 720 | Front edge banded, hidden edges raw |
| 3 | Leg frame set | 40×20mm steel box section, powder coat PC-Black | 680(H) (26.8) | 2 | set | 1,650 | 3,300 | Includes leveling glides |
| 4 | Desktop brackets | Steel L-bracket, zinc plated | 100×100mm (3.9×3.9) | 8 | pc | 45 | 360 | 4 per leg frame |
| 5 | Screws assortment | SS 304, M6 & M8 | – | 1 | kit | 180 | 180 | 5% spare included |
| 6 | Cable grommet | Plastic, Ø60mm, black | Ø60 (2.4) | 2 | pc | 95 | 190 | Centered on rear edge |
| 7 | Modesty panel brackets | Steel flat bracket | 80×40mm (3.1×1.6) | 4 | pc | 35 | 140 | Attach panel to frame |
| 8 | Edge banding tape | PVC EB-02, 22mm width | 8m linear (26.2 ft) | 1 | roll | 240 | 240 | Includes 10% waste |
| 9 | Contact adhesive | General purpose | – | 0.25 | L | 320 | 80 | For edge banding |
| 10 | Wood putty | Filler, light oak | - | 0.1 | kg | 180 | 18 | Touch-ups |
Materials Subtotal: | ₹8,028 | |||||||
Estimated Labor (assembly, finishing): | ₹1,200 | 2.5 hrs @ ₹480/hr | ||||||
Waste & Contingency (3%): | ₹241 | On materials | ||||||
Total Estimated Cost: | ₹9,469 | |||||||
Office Desk – Bill of Materials with Cut Sizes, Hardware, and Costs
Cost Roll-Up Breakdown
Understanding where your money goes helps optimize your furniture bill of materials:
- Panel materials (Items 1-2): ₹3,520 (37% of material cost) – Desktop and modesty panels with laminate finish
- Frame & structure (Item 3): ₹3,300 (35% of material cost) – Steel leg frames with powder coating
- Hardware & fasteners (Items 4-7): ₹870 (9% of material cost) – Brackets, screws, grommets, mounting hardware
- Finishes & consumables (Items 8-10): ₹338 (4% of material cost) – Edge banding, adhesive, putty
- Labor: ₹1,200 (13% of total) – Assembly, edge banding application, finishing touches
- Waste allowance: ₹241 (3%) – Accounts for cutting waste on panels, extra fasteners, and spillage on adhesives
Cost Optimization Tip:
Office Desk – Bill of Materials Calculator
Metric first • mm (+ in)Line Items
Parts (Panels/Wood Components)
Hardware
Consumables & Finishes
Summary
Utilities
Design Variations & Multi-Level BOM Benefits
This bill of materials template becomes even more powerful when you need variants:
Finish variations:
- Budget version: Replace laminate L-310 with melamine finish (saves ₹400 per unit); use single-edge banding on front edge only
- Premium version: Upgrade to natural wood veneer with clear coat finish (adds ₹1,200); use solid wood edge banding instead of PVC
Frame variations:
- Wooden legs: Replace steel frame (Item 3) with solid wood legs 70×70×680mm (saves ₹800 but adds weight)
- Heavy-duty frame: Upgrade to 50×30mm box section steel for sit-stand conversion compatibility (adds ₹500).
These variations are easily managed using a multi-level BOM, where only sub-assembly details change.
How to Create a Furniture BOM: Step-by-Step Guide
Quick Answer:
Creating a furniture Bill of Materials doesn’t have to be complicated. Follow these steps to create a BOM that prevents costly mistakes and keeps production on track.
Step 1: Define the finished piece – List overall size, design, and functionality (e.g., “Office desk 1400×700×750 mm”). Sketch or CAD model the design with all views.
Step 2: Break into assemblies – Divide into logical groups (Top, Frame, Finish). This creates your BOM structure.
Step 3: List every component – Don't just list panels and legs. Include edge banding, wood putty, sandpaper grades, adhesive, finish coats, packaging materials, and even the smallest screws.
Step 4: Add dimensions & cut sizes – Mention both metric and inch equivalents, with grain direction.
Step 5: Set units and quantities – Be consistent – use "pc" for pieces, "set" for kits, "m" or "sq.m" for linear/area materials, "L" for liquids, "kg" for bulk materials. Calculate exact quantities, then add waste percentage.
Step 6: Add unit costs and calculate totals – Pull from supplier quotes or standard price lists. Set up formulas to auto-calculate line totals (Quantity × Unit Cost) and grand total. Update these costs monthly for accuracy.
Step 7: Add waste factors – Add 2-3% waste for panels (saw kerf, edge trimming), 5-10% for hardware (lost screws, damaged threads), and 10-15% for finish materials (absorption, spillage). Mark these clearly.
Step 8: Include version info – Every BOM should have a header with version number (v1.0, v1.1, v2.0), date created, last modified date, and author name.
Step 9: Link drawings or photos – Attach images or reference sketches. Visual references prevent misinterpretation and speed up production planning.
Step 10: Validate with a QA checklist: Before finalizing, run through a quality check (see next section). Verify all hardware is listed, units match across the document, costs are current, and the BOM matches your design drawings.
Want a head start?
Get started immediately with our professionally designed furniture bill of materials templates. These templates include everything shown in this guide – proper formatting, cost calculations, waste percentages, and QA checklists.
Furniture BOM Template features: Single-level and multi-level versions, Locked formulas for cost totals, Unit validation (pcs, sq.m, set), Tabs for parts, hardware, finishes, and summary, QA Verification, Checklist (10-point review), Completed Office Desk example (all data filled in as reference)
Common Mistakes & QA Checks
Even seasoned manufacturers make mistakes when preparing BOMs. Here are the most common issues, and how to prevent them.
Frequent Mistakes
- Missing hardware or consumables like screws, glides, or adhesives.
- Incorrect units (e.g., entering meters instead of pieces).
- Ignoring edge banding lengths, counting only visible edges.
- Not specifying finishes or laminates clearly by code.
- Version confusion, using outdated BOMs without revision control.
- Forgetting grain direction and orientation
10-Point QA Checklist
- Verify all material dimensions (mm + in).
- Check all quantities match drawings.
- Confirm edge banding applied correctly.
- Review finish codes and directions.
- Ensure hardware kits are complete.
- Validate unit costs against supplier quotes.
- Include labor and contingency costs.
- Cross-check cut list and BOM alignment.
- Add version/date info.
- Final review by QA or production head.
Performing these checks before production saves hours of rework and helps ensure consistent, quality furniture output.
Conclusion
A well-prepared bill of materials for furniture is more than just a spreadsheet; it’s your roadmap to efficiency, cost control, and consistency. From a small studio to a large manufacturing unit, the BOM streamlines every stage of production, from material purchase to final polish.
By combining detailed part listings, accurate dimensions, and cost roll-ups, you not only prevent mistakes but also make your furniture production scalable and repeatable.
Have a spec sheet ready?
Send it on WhatsApp, get sourcing feasibility in 24 hours.