Revit Families for Hotel Casegoods: A Complete Guide
Revit Families for Hotel Casegoods: A Complete Guide
If you're a BIM manager, interior designer, or FF&E project manager coordinating a hotel guestroom package, you've probably had this moment: the Revit model looks complete, the casegoods are placed, and someone asks whether the families are actually ready to send to a manufacturer. More often than not, they're not.
This guide walks through the full workflow – how to build hotel casegood families that hold the right data, set up switchable finish parameters, nest hardware schedules, understand when LOD 300 is enough and when it isn't, and export a BOQ your contract manufacturer can quote from directly.
Quick Answer
Key Takeaway
- Hotel casegoods in Revit should be modelled at LOD 300 minimum, with LOD 350 required when handing off to a contract manufacturer.
- Each Revit family needs switchable finish parameters (HPL, veneer, lacquer, laminate) to support procurement decisions without rebuilding geometry.
- Nested shared families for handles, hinges, and locks allow hardware schedules to be extracted directly from Revit.
- A Revit casegood schedule can be exported as a procurement-ready BOQ – but only if shared parameters are set up correctly from the start.
- Design-intent families and manufacturer-ready families serve different purposes. Confusing the two is the most common cause of procurement delays on hotel FF&E projects.
- A casegood RFA file sent to a factory without dimension tolerances, installation clearances, and a shared parameter file will cause problems at the sample stage.

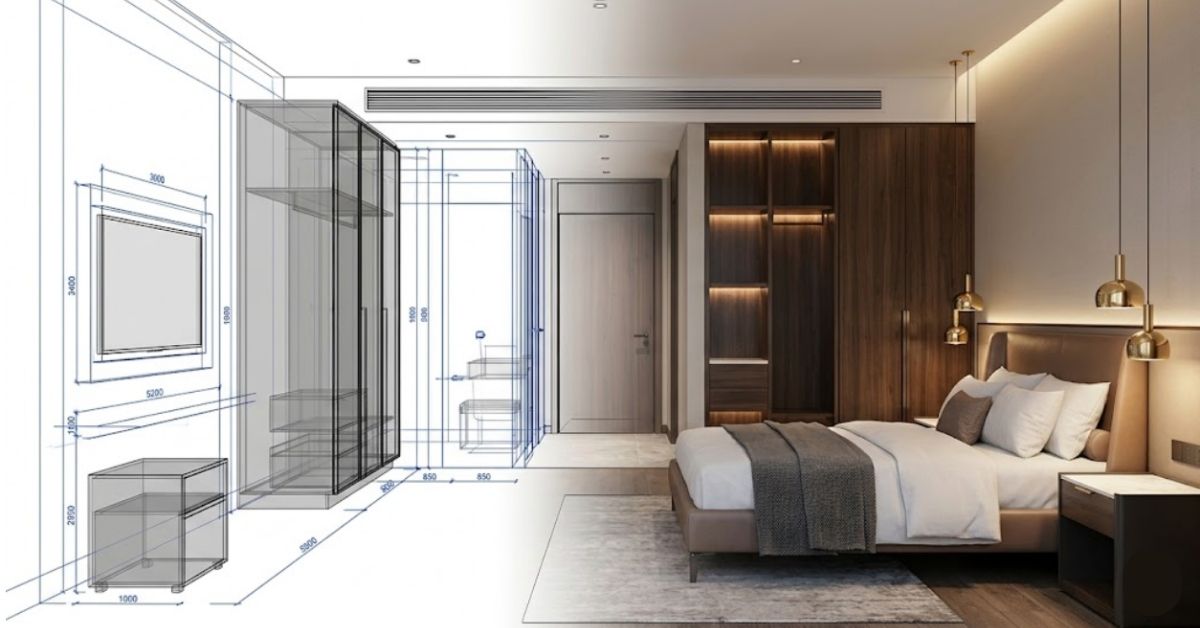
What Are Hotel Casegoods?
Definition
In a standard hotel guestroom, casegoods typically include:
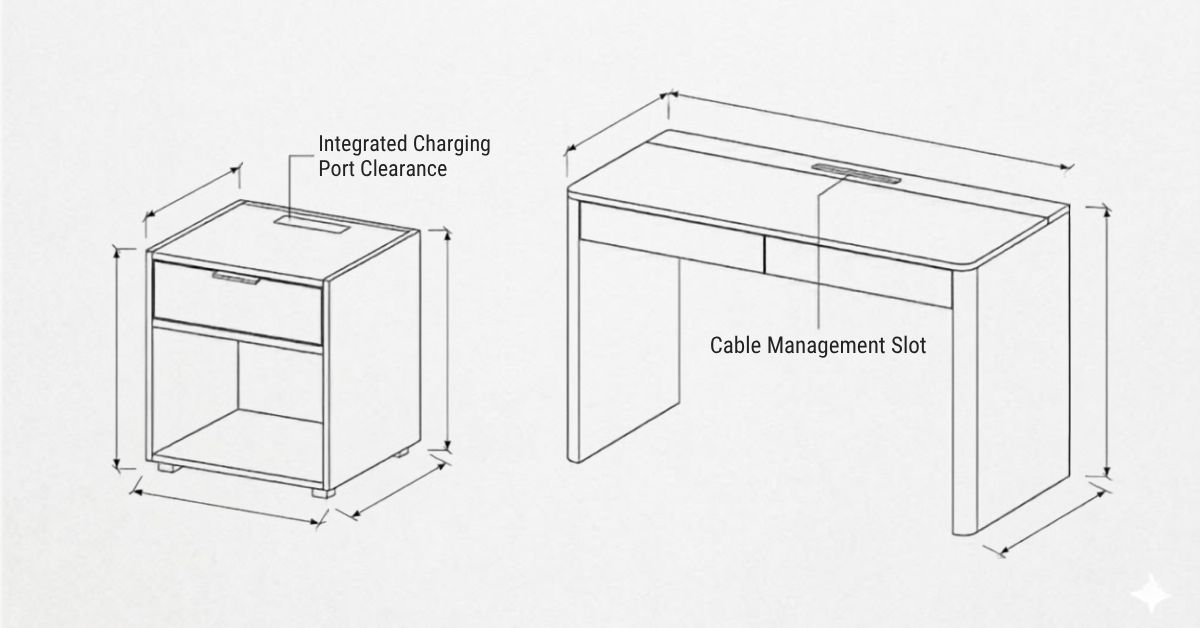
- Nightstand – bedside table with drawer and sometimes an integrated charging unit
- Wardrobe – full-height unit with hanging space, shelving, and often a safe and minibar
- Dresser – low chest with drawers, usually paired with a wall mirror
- TV unit – low console holding the television, often with display shelving
- Writing desk – work surface with under-desk storage and cable management
- Minibar unit – under-counter casegood housing the minibar fridge and glassware storage
Each of these is a distinct Revit family category. They have different geometries, different parameter sets, and different dimensional tolerances. Treating them as interchangeable in a BIM model causes problems well before construction starts.
Why Revit Families Matter for Hotel FF&E Projects
BIM families for hospitality furniture are not just placeholder geometry. On a recent 180-room hotel project, the BIM handover package included wardrobe families with no internal configuration data and finish parameters labelled simply "Veneer - Light Wood." The factory's first query arrived within 48 hours of receiving the files. Six weeks passed before samples were approved. The cause wasn't the factory – it was the documentation.
This happens on hotel FF&E projects more than it should, because the Revit model is often the first document a contractor or manufacturer receives. When that model is built with generic families or incomplete parameters, the gap shows up in RFQs, sample rejections, and production delays that push handover timelines out.
A properly built Revit family for hotel casegoods does four specific things that generic furniture blocks don't:
- It holds accurate dimensional data that matches the manufacturer's spec sheet – not a placeholder footprint.
- It carries finish parameters so procurement can switch between HPL, veneer, and lacquer without rebuilding geometry.
- It enables schedule extraction directly from Revit, giving procurement a clean quantity takeoff without manual counting.
- It contains the information a factory needs to produce a shop drawing, which cuts the back-and-forth at the sample stage significantly.
Hotel BIM documentation that skips any of these four functions adds time and cost. A generic block gets you through design review. It doesn't get a wardrobe produced on time and to spec.
Before Your Team Sends a Revit Package to a Manufacturer
Most hotel FF&E delays happen because the Revit families are technically usable for design coordination – but not usable for procurement.
Run the hotel casegoods Revit procurement readiness checker to identify missing manufacturer-side information, LOD gaps, hardware scheduling issues, finish parameter problems, BOQ export risks, tolerance and clearance errors. The assessment gives a procurement-readiness score and flags the exact issues most likely to create RFQs, sample-stage delays, and factory queries later.
Standard Dimensions for Hotel Casegoods: A Revit Reference Table
This is a practical reference for setting up Revit family parameters on hotel guestroom casegoods. Dimensions reflect typical commercial-grade hotel specifications. Always validate against the project's specific brand standards before finalising.
Casegood Type | Width (mm) | Depth (mm) | Height (mm) | Revit Notes |
Nightstand | 450 – 600 | 400 – 500 | 550 – 650 | Include drawer count, charging port parameter, and leg height |
Wardrobe | 900 – 1200 | 550 – 650 | 2100 – 2400 | Add internal shelf, hanging rail, safe, minibar as nested families |
Dresser | 1000 – 1400 | 450 – 550 | 800 – 900 | Drawer count as parameter; mirror not typically nested |
TV Unit | 1200 – 1800 | 450 – 500 | 450 – 550 | Cable management slot, bracket offset as parameters |
Writing Desk | 1000 – 1400 | 500 – 600 | 720 – 780 | Modesty panel, cable outlet, and leg clearance as parameters |
Minibar Unit | 500 – 600 | 500 – 560 | 850 – 900 | Fridge recess depth critical; include ventilation clearance |
Revit setup note: Set width, depth, and height as instance parameters if the project has multiple room types with varying sizes. If all rooms are identical, type parameters are cleaner and easier to schedule.
How to Create a Revit Family for Hotel Casegoods
Step 1: Choose the right Revit family category
Open Autodesk Revit and start a new family from the Metric Generic Model or Furniture template. For hotel casegoods, the correct family category is Furniture or Casework, depending on whether the piece is freestanding or built into a wall recess. A wardrobe that sits against a wall without being fixed is Furniture. A built-in wardrobe flush with adjacent joinery is Casework. Getting this wrong affects how the family appears in schedules and how it interacts with room calculations.
Step 2: Build the geometry to correct tolerances
Use reference planes and reference lines as the geometric skeleton before extruding any solid geometry. This keeps the family flexible. Set dimensional constraints between reference planes using Revit's dimension tool, then lock them. Every controlled dimension should be driven by a parameter, not by a hard extrusion value.
Tolerance for hotel casegoods in Revit: LOD 300 requires dimensional accuracy to within plus or minus 3mm. LOD 350 requires enough detail to show installation clearances and connection points.
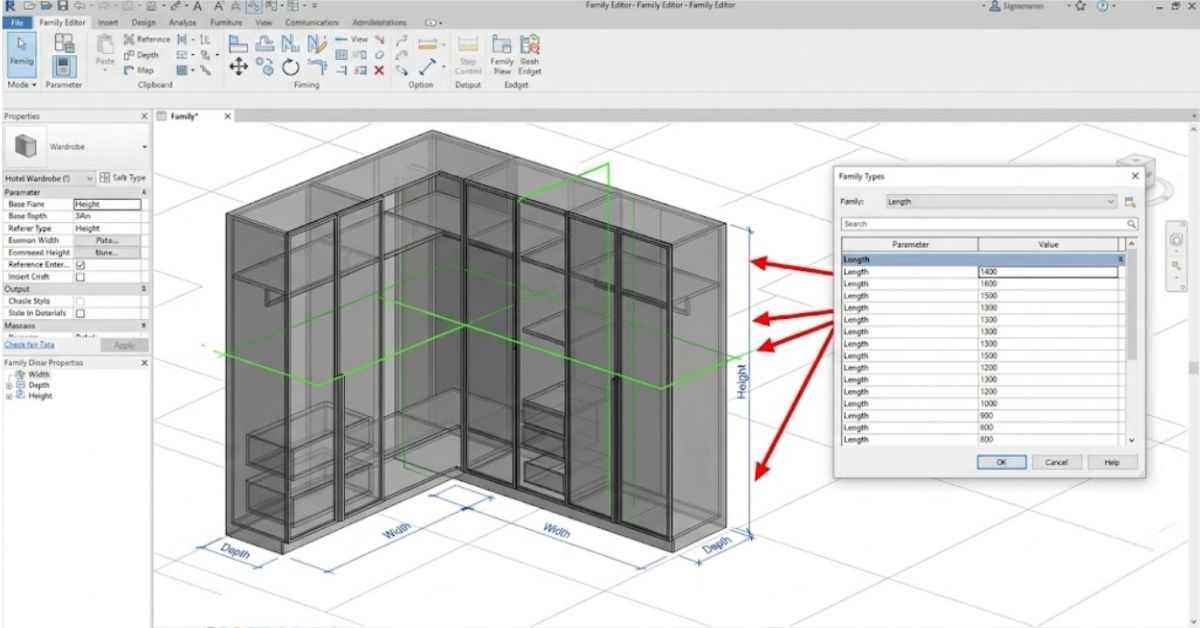
Step 3: Set up dimension parameters
In the Family Properties panel, add the following as instance or type parameters, depending on project requirements:
- Width, Depth, Height (all as length parameters)
- Drawer count (integer parameter)
- Door count (integer parameter)
- Leg height (length parameter, if applicable)
- Installation clearance top, sides, base (length parameters)
Step 4: Set up material finish parameters as switchable types
This is covered in detail in the section below. At minimum, add a Material parameter for the exterior carcass and a separate Material parameter for the front panels (doors, drawer fronts). These are the two surfaces that change most often during procurement and approval.
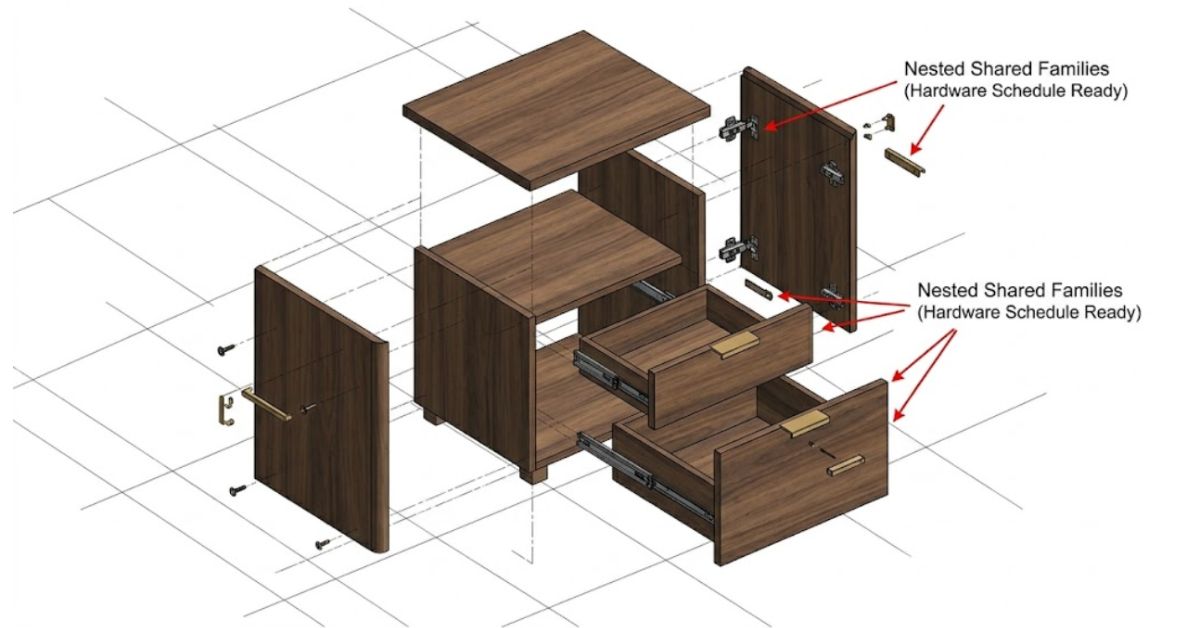
Step 5: Add nested families for hardware
Handles, hinges, and locks should be separate nested shared families, not geometry built into the parent casegood family. This allows Revit to schedule them independently. A hardware schedule extracted from Revit is one of the most useful documents a procurement team can send to a sourcing partner.
Step 6: Test the family before adding to the project model
Load the family into a test Revit project file. Check that all parameters flex correctly, no geometry breaks when dimensions are changed, and the family appears correctly in a Revit schedule view. Fix any issues before the family enters the main hotel model.
Pro Tip
Material Finish Parameters: HPL, Veneer, Lacquer, Laminate as Switchable Types
This is one of the most useful things a Revit casegood family can do, and almost no published guidance covers it in a hotel context.
In Autodesk Revit's Family Editor, add a Material parameter to the solid extrusions that represent the visible surfaces of the casegood (carcass exterior, door panels, drawer fronts). Name the parameter clearly: "Finish - Exterior Carcass" and "Finish - Front Panels".
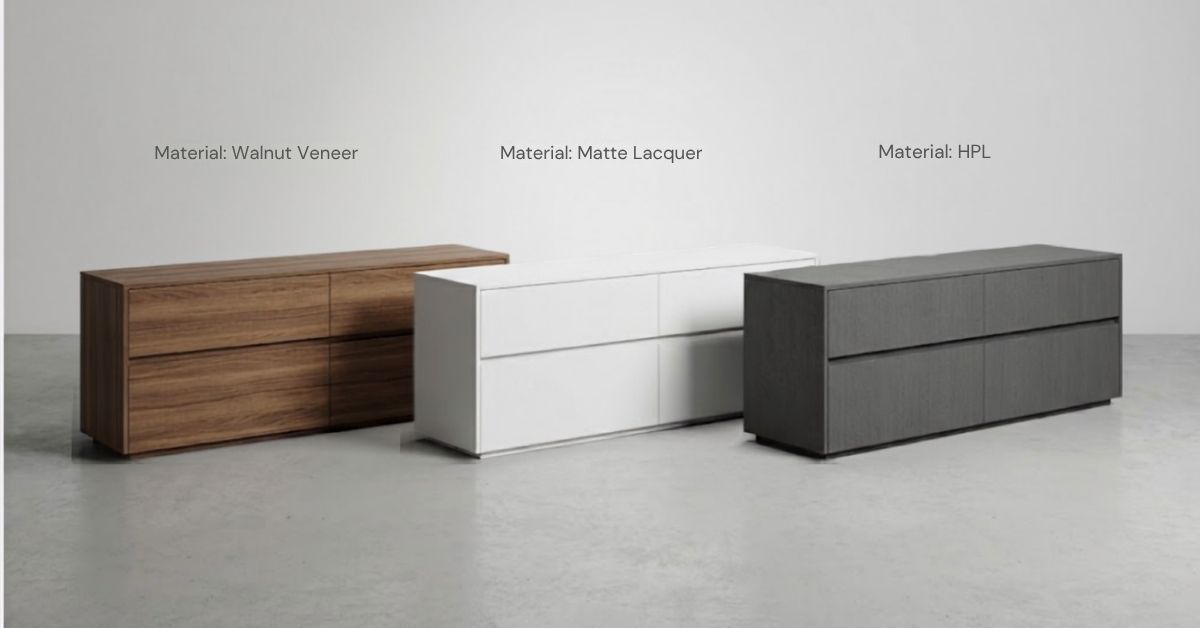
Then, in the Revit project file, create material assets for each finish type:
- HPL (High Pressure Laminate): Set surface texture and colour in the Revit material library. Use the manufacturer's reference code as the material name.
- Veneer: Use a wood grain texture asset. Include the species, grain direction, and finish (open/closed pore lacquer).
- Lacquer: Solid colour material. Include RAL or NCS reference code.
- Laminate: Similar to HPL but typically thinner application. Note the substrate.
When a procurement decision changes the finish from veneer to HPL, you change one parameter in the Revit schedule, not the geometry. The BOQ update is automatic.
Pro Tip
Not Sure Your Finish Parameters Are Procurement-Ready?
Many hotel Revit families fail procurement review because material naming is inconsistent across schedules, families, and finish specifications. Run the Hotel Casegoods Revit Procurement Readiness Checker to verify finish naming consistency, material parameter structure, schedule compatibility, and manufacturer-ready finish coding.
Nested Families for Hardware: Handles, Hinges, Locks
A nested shared family is a Revit family loaded inside another Revit family. Shared means the nested component can still appear in project schedules independently.
For hotel casegoods:
- Create a handle family with finish type and length as parameters.
- Create a hinge family with material and type (concealed/visible) as parameters.
- Load these into the wardrobe and dresser families as nested shared families.
- Host them on the correct reference planes so they move with the door geometry.
When the project model is open, run a Revit Multi-Category Schedule. Filter by the handle family category. You now have a complete hardware schedule sorted by room, floor, or unit type. This feeds directly into a hardware procurement list without manual counting.
LOD 300 vs LOD 350 for Hotel Casegoods: When Does the Difference Matter?
Definition: LOD (Level of Development)
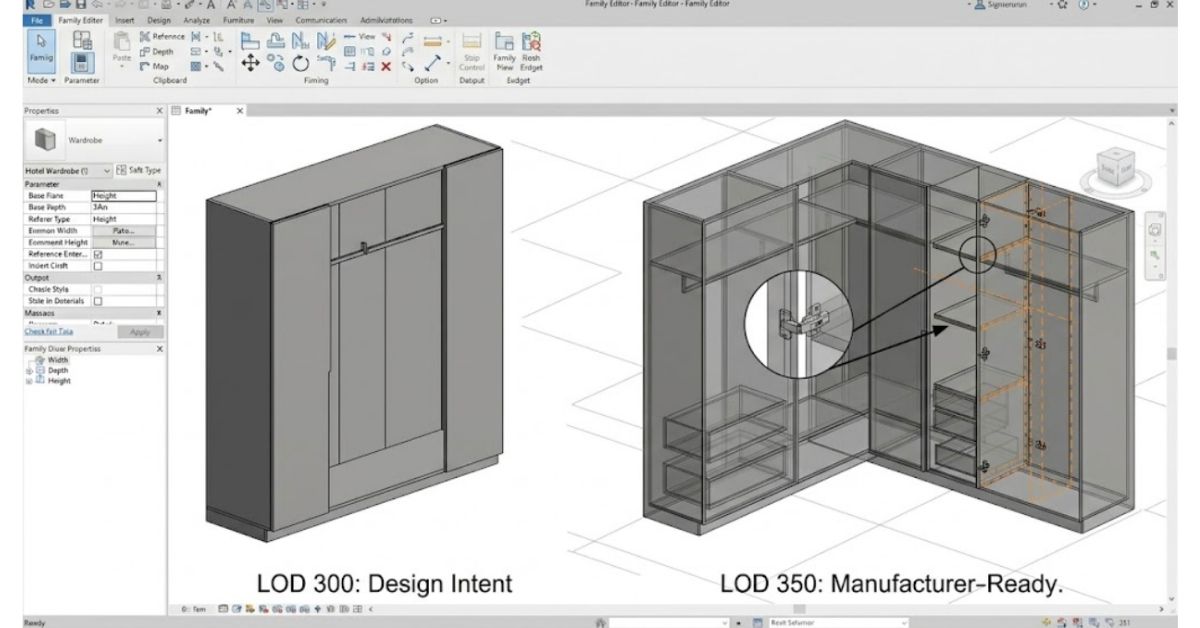
LOD 300 means the element is modelled with specific geometry, dimensions, and location. The family correctly represents the casegood's size, position, and rough composition. Parameters include finish type and basic hardware information. Suitable for design development, coordination, and space planning.
LOD 350 adds the interface information required for installation. This means the Revit family includes installation clearances, anchoring points, connection conditions to adjacent elements (walls, floor, ceiling), and any embedded services (power, data). For a hotel wardrobe at LOD 350, the family shows the wall fixing bracket positions, the cable entry point for the minibar fridge, and the clearance required at the top for fire sprinkler access.
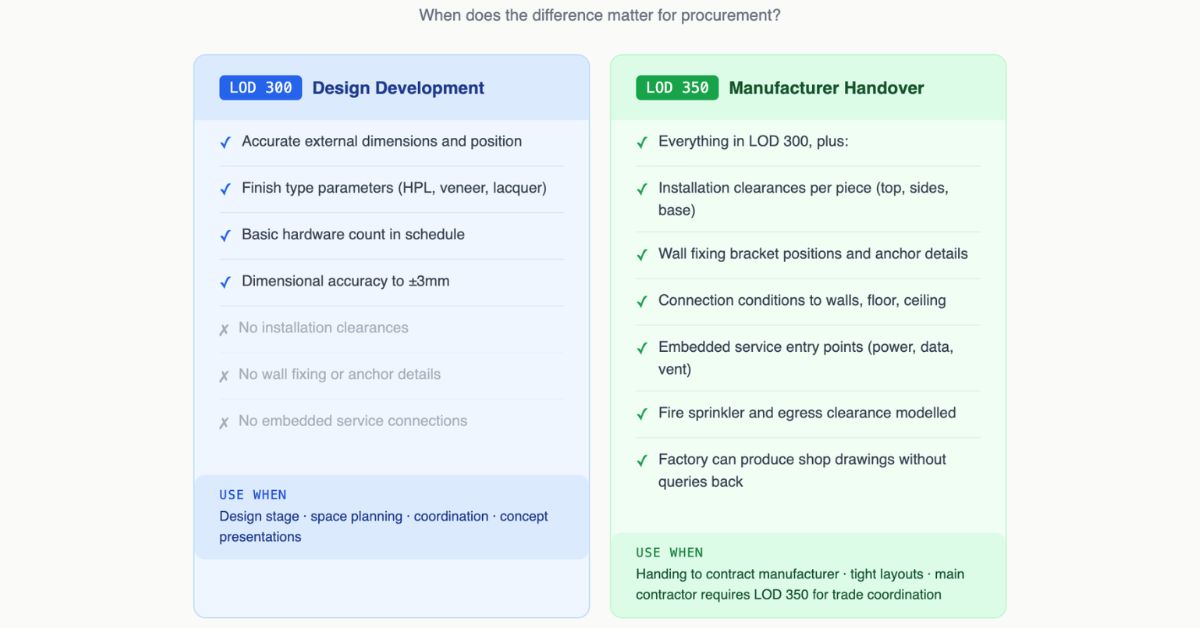
When to use LOD 350 for hotel casegoods:
- The casegood will be manufactured by a contract manufacturer using the Revit file as a reference.
- The hotel has a tight guestroom layout where clearances affect door swing and egress.
- The project is going to a main contractor who requires LOD 350 for trade coordination.
When LOD 300 is sufficient:
- Early design stage where dimensions are not yet finalised.
- Concept presentations and area calculations.
- Projects where the manufacturer will produce their own shop drawings independently.
LOD 300 Is Often Enough for Design Review. It Is Not Always Enough for Manufacturing.
A family can meet BIM coordination standards and still fail when a contract manufacturer tries to build from it. The Hotel Casegoods Revit Procurement Readiness Checker identifies missing installation clearance data, absent tolerance parameters, incomplete hardware nesting, LOD gaps affecting production review, BOQ extraction risks.
Hotel Casegoods Revit Checklist
Use this checklist before sending any Revit casegoods family or model file to a manufacturer or procurement team.
Family Setup
Schedule Readiness
Manufacturer Handover
If your checklist is complete but you're not confident the documentation package will hold up when a factory opens it, that review is something Arcedior runs before handover. A documentation check at this stage is faster and cheaper than a sample rejection four weeks later.
Design-Intent vs Manufacturer-Ready Revit Families: What the Factory Actually Needs
This is one of the most misunderstood areas in hotel FF&E BIM documentation, and it costs projects weeks.
A design-intent Revit family is built by an architect or interior designer to represent the casegood correctly in the model. It has the right footprint, a plausible visual representation, and enough parameter data to work in a coordinated BIM model. It serves the design team's needs. It is not what a factory uses.
A manufacturer-ready Revit family contains the information a contract furniture factory needs to produce a shop drawing and proceed to production. That means:
- Exact external dimensions with tolerance ranges stated
- Internal dimensions (shelf depths, drawer opening heights, hanging rail positions)
- Panel thickness specified (18mm, 25mm, etc.)
- Finish code per surface, not just a material name
- Hardware specified by manufacturer code, not just "handle."
- Installation clearances so the factory can calculate packing and site fit
- Connection details for any wall-fixed or ceiling-fixed elements
The gap between these two types of families is where hotel FF&E projects lose time. A design team sends an RFA file to a sourcing partner. The factory opens it and finds correct external geometry but no internal configuration, no panel thicknesses, and finish parameters that say "Veneer - Light Wood" without a species, cut, or supplier reference. The factory cannot proceed. Queries start. Lead time slips.
If your project is heading to a contract manufacturer, the Revit casegoods documentation needs to go through a manufacturer-readiness review before handover. Arcedior reviews FF&E BIM packages against factory requirements and manages the sourcing route, MOQ negotiation, and lead time planning with contract furniture manufacturers.
How to Export a BOQ from Your Revit Casegood Schedule for Procurement
BOQ stands for Bill of Quantities. A BOQ from Revit casegoods is a line-item list of every casegood piece in the project, with quantities, dimensions, finish specifications, and hardware counts. This is what a procurement team sends to a contract manufacturer when requesting quotes.
Here is how to generate one from Autodesk Revit:
- Set up a Multi-Category Schedule in Revit. Filter by Furniture and Casework categories. Include all Revit families in your hotel casegoods library.
- Add the correct fields. At minimum: Family Name, Type, Count, Width, Depth, Height, Finish - Exterior Carcass, Finish - Front Panels, Room Name, Room Number, Level.
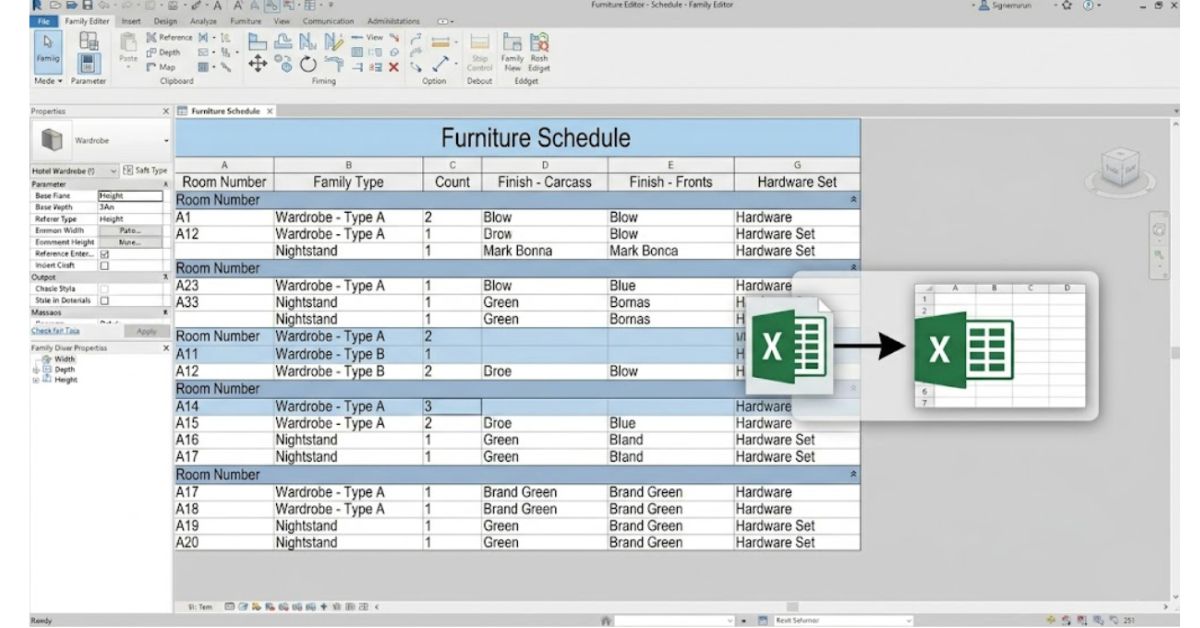
- Group and sort by Room Number. This organises the schedule by guestroom, which is how a hotel procurement list is structured. A factory quoting for a 200-room hotel needs quantities by room type, not by floor.
- Export to CSV or Excel. In Revit, go to the schedule view and use File > Export > Reports > Schedule. Export as a tab-delimited text or directly open in Excel.
- Clean the exported file. Remove Revit formatting artefacts. Add a column for Unit Cost (to be filled by the supplier), Total Cost, and Lead Time. Add your project reference number and revision date.
- Cross-reference with the finish schedule. The Revit schedule carries finish parameter names. The finish schedule document carries the full specification (material grade, supplier, colour reference). Both documents go to the manufacturer together.
The BOQ produced through this workflow is the primary sourcing document for the casegoods package. It replaces manual spreadsheet counting, reduces errors, and means any design change in Revit updates the quantity automatically on the next export.
If your team is at this stage and needs support converting a Revit casegood schedule into a manufacturer-ready sourcing package, Arcedior can review your documentation and manage the BOQ-to-quote process with contract furniture manufacturers.
5 Common Revit Hotel Casegood Errors That Delay Procurement
These are not theoretical problems. They come up on real hotel projects, and they all push lead times out.
Error 1: Wrong Revit family category
Using a generic model instead of Furniture or Casework means the family does not appear in room-based schedules correctly. Procurement gets an incomplete BOQ. Quantities are wrong. The factory quotes the wrong number of units.
Error 2: No shared parameter file
Families built with local parameters (not linked to a shared parameter file) cannot be scheduled across multiple families in a project. If the nightstand and wardrobe use different parameter names for Width, the schedule cannot combine them. Set up a shared parameter file at project start and map every casegood family to it.
Error 3: Missing hardware parameters
If handles, hinges, and locks are modelled as generic geometry rather than nested shared families with parameters, there is no hardware schedule. The procurement team has to count hardware manually from drawings. This takes time and introduces errors. On a 150-room hotel, the difference between a correct and incorrect handle count can be 800 units.
Error 4: Incorrect dimensional tolerances
Revit families modelled at nominal dimensions without tolerance ranges cause problems at the site. A wardrobe modelled at 1200mm wide, placed in a recess with 1205mm clearance, has only 2.5mm clearance per side. If the factory produces to a +2mm tolerance (standard for MDF casegoods), the unit won't fit.
How to set up tolerance parameters in Revit:
- In the Family Editor, open Family Types and add two new Length parameters per critical dimension: for example, Width_Nominal, Width_Tolerance_Plus, Width_Tolerance_Minus. Set default values for the tolerance parameters (e.g., +2mm / -0mm for standard MDF production).
- Add a text parameter called Tolerance_Note and enter the tolerance range as a string (e.g., "1200 +2/-0 mm"). This appears in the exported schedule and in the BOQ without any manual transcription.
- In the project Revit schedule, add the Tolerance_Note field as a column. When the BOQ is exported to Excel, each casegood line carries its own tolerance range automatically.
- In the handover documentation cover sheet, note the production tolerance standard explicitly – for example, "All casegoods manufactured to BS EN 14749 dimensional tolerances unless stated otherwise."
This takes roughly 20 minutes per family type to set up. It prevents one of the most common and expensive site problems on hotel FF&E projects.
Error 5: No installation clearance
Hotel guestrooms are tight. A wardrobe door that opens 120 degrees needs floor clearance in front of it. A TV unit needs wall clearance behind for HDMI cable management. A minibar unit needs top and rear ventilation clearance. None of these show up in a basic Revit model unless someone adds them deliberately. At LOD 350, installation clearances are required. But even at LOD 300, noting them in a parameter prevents expensive site problems.
Pro Tip
Found One of These Issues in Your BIM Package?
It's better to catch it before the RFQ goes out than after samples get rejected.
Share your Revit schedule, family structure, or BOQ with Arcedior's procurement team for a quick manufacturer-side review.
Conclusion
Six weeks were lost at the sample stage because a finish parameter said "Veneer - Light Wood" instead of a supplier code. Eight hundred handles were miscounted because the hardware was modelled as generic geometry instead of nested shared families. A wardrobe that doesn't fit its recess because tolerance parameters were never set up. These aren't edge cases – they're the standard outcome when Revit families are built for design review and handed directly to a manufacturer.
The workflow in this guide – parametric geometry from the start, switchable finish types, nested hardware families, LOD 350 where it counts, and a clean BOQ export – closes that gap. Not all at once, and not without effort. But each step removes a class of problems from the procurement process.
The families that work best in hotel FF&E projects are the ones built by someone who has been on the receiving end of a factory query. If you're working toward that standard, this guide covers the technical path. If you need the documentation to connect directly to a sourcing and manufacturing process, that's where Arcedior operates.
Before Moving Into Sourcing, Validate the Package First
Run the Hotel Casegoods Revit Procurement Readiness Checker to identify missing manufacturer-side information, procurement risks, and BOQ issues before supplier engagement begins.