Tolerance Standards in Furniture Joins | Guide + Checklist
Tolerance Standards in Furniture Joins: Practical Limits + QC Checklist
The photos looked immaculate. The factory signed off. The shipment arrived on time.
Then installation day happened, and the snag list started filling up fast: drawer gaps that look uneven, cabinet doors that refuse to sit flush, panel lines that wave instead of running straight. The guest room handover gets pushed. The punchlist grows. And nobody can agree on who is responsible.
This is one of the most common and avoidable problems in hospitality and contract furniture procurement. In almost every case, it traces back to the same root cause: tolerance standards in furniture joins were never clearly defined, never written into the spec, and never verified before the container was sealed.
This guide breaks down practical tolerance limits for the four join types that matter most, how to measure them on the factory floor, where failures actually come from, and what a structured QC workflow looks like from mockup to delivery.
Quick Answer: What Are Tolerance Standards in Furniture Joins?
What "Tolerance" Actually Means in Furniture Joins
Most buyers are familiar with dimension tolerance, how close a finished piece is to its specified measurements. Join tolerance is a narrower, more specific concept. It is about how panels, doors, drawers, and modules meet each other at visible joints and edges.
A cabinet might be dimensionally accurate to within 1 mm and still have a door gap that looks sloppy, a drawer reveal that is visibly uneven, or a flush step between two panels that catches light the wrong way.
Join tolerance covers four things:
- Gap/reveal: the visible spacing between door edges, drawer faces, or adjacent panels
- Flushness: whether two surfaces sit at the same level or one sits proud of the other (also called a lip or step)
- Alignment: whether horizontal or vertical lines stay consistent across multiple modules or units
- Squareness: whether a carcass, door, or drawer box is truly square, checked by comparing diagonal measurements
These are the tolerances guests and end-users actually see. And they are the ones most likely to generate complaints after installation.
Tolerance Standards in Furniture Joins: What Buyers Should Define
Most procurement briefs specify dimensions. Very few specify join behaviour. That gap is where problems start.
Before production begins, buyers should define tolerance standards in furniture joins across four variables for each furniture category and zone: what gap is acceptable, how much flushness variation is permitted, how far alignment can deviate across a module run, and what the squareness limit is for each carcass type. These values should be different for guest-facing areas, standard zones, and back-of-house, because applying the same tolerance everywhere either adds unnecessary cost or guarantees snag list complaints in the wrong places.
The right time to lock these in is mockup sign-off, not mid-production and definitely not post-delivery. Once the run is complete, rework is expensive. A signed mockup with documented tolerances gives both sides a reference point that takes the guesswork out of every QC conversation that follows.
See how we structure the QC process across production runs for hospitality projects.
The 4 Join Tolerances Buyers Should Always Specify
Here are practical working ranges used across hospitality and contract furniture procurement. These are not ISO citations; they are field-tested benchmarks. Lock your final values at mockup sign-off, not after production begins.
Join type | Premium / guest-facing | Standard | Back-of-house |
Door/drawer reveal gap Visible spacing between faces | 1.5 – 2.5 mm consistent | 2 – 3.5 mm | up to 4 mm |
Reveal consistency Variation across the same unit | max 0.5 mm variation | max 1 mm variation | max 1.5 mm variation |
Flushness step (lip) Height diff between adjacent panels | max 0.5 mm | max 1 mm | max 1.5 mm |
Alignment across modules Deviation from a straight line | max 1 mm over full run | max 1.5 mm | max 2 mm |
Squareness (diagonal diff) d1 minus d2, corner to corner | max 1.5 mm | max 2.5 mm | max 3 mm |
Edge banding overhang Protrusion past the panel face | flush to 0.3 mm max | flush to 0.5 mm max | 0.5 mm max |
These tolerance ranges are based on real-world procurement and QC workflows across hospitality and commercial furniture projects, not theoretical standards.
Pro Tip
How to Measure Join Tolerances on the Factory Floor
You do not need expensive equipment to measure joint tolerances reliably. Here is what a practical QC team uses:
Tools:
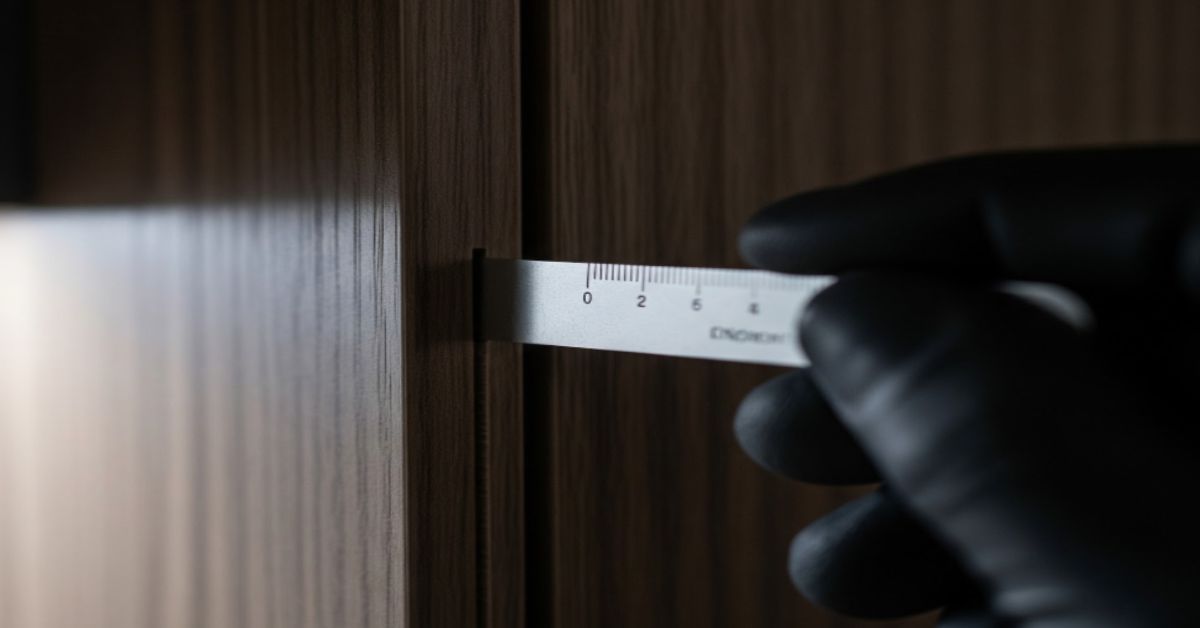
- Feeler gauge set (0.1 mm to 3 mm blades) for measuring gaps and steps
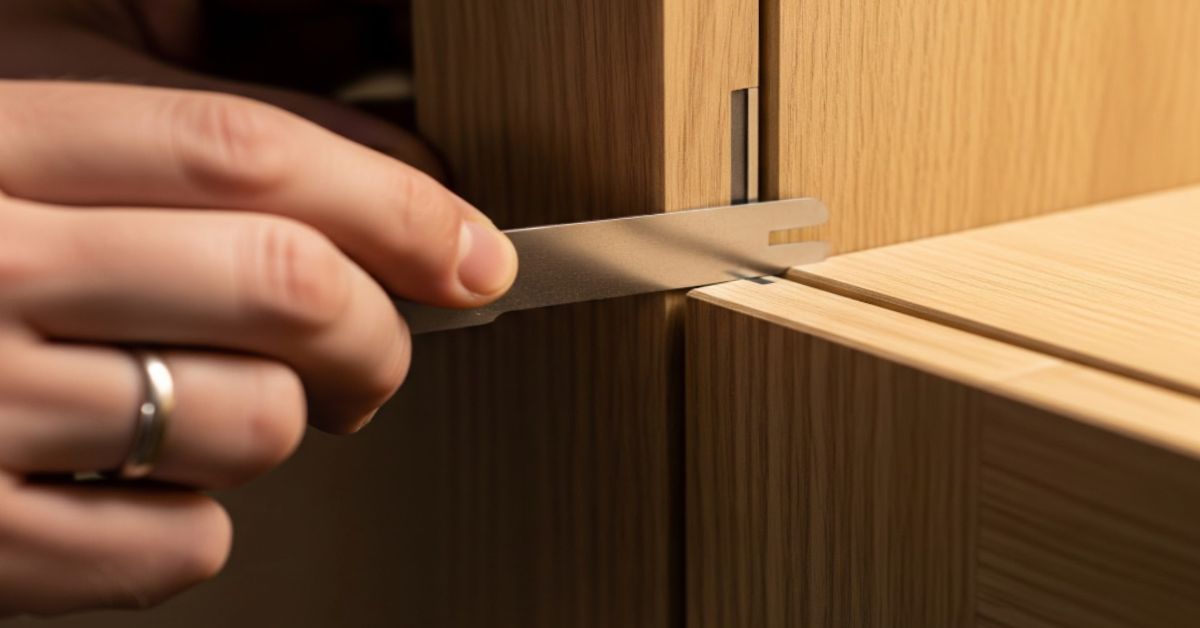
- Straight edge or spirit level (minimum 600 mm) for alignment checks
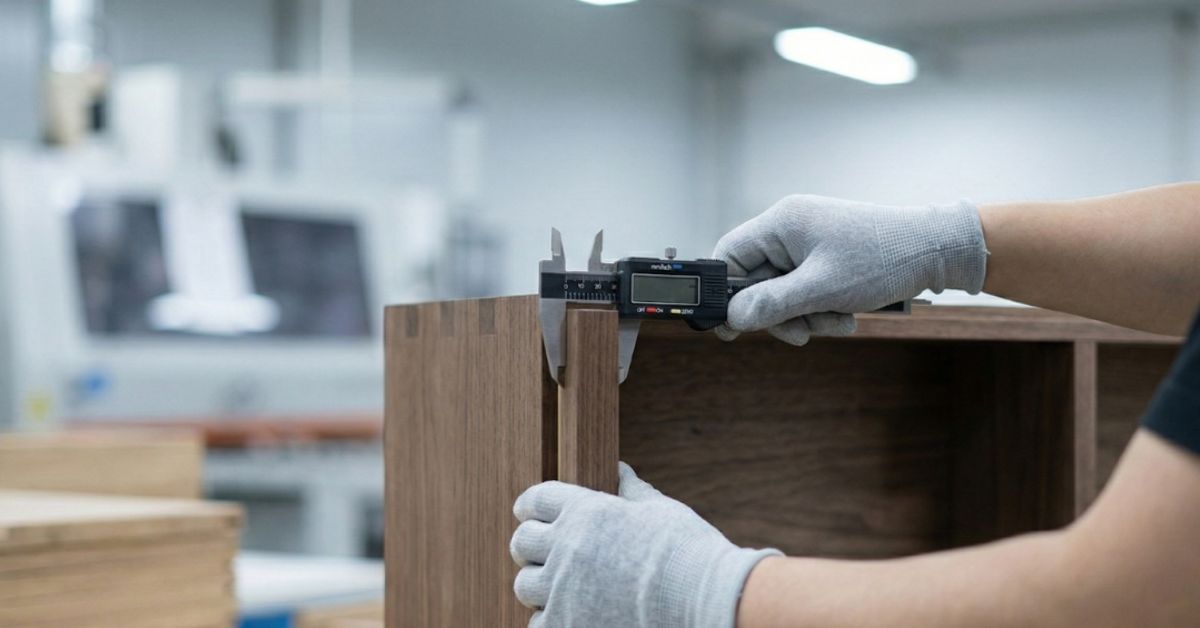
- Combination square or try square for squareness checks
- Tape measure for diagonal measurement (squareness)
- Good directional lighting or a torch for flushness checks
5-Step Measurement Method:
- Set up the piece on a level surface before measuring. Uneven floors introduce false readings, especially for squareness.
- Measure visible gaps using the feeler gauge. Slide the appropriate blade into the gap without forcing it. Record the widest and narrowest point on the same door or drawer run.
- Check flushness by running a straight edge across the join and using a feeler gauge to measure any step. Shine a light behind the straight edge to spot gaps.
- Check alignment across multiple modules with a long straight edge or taut line. Measure any deviation from the reference line at the most prominent panel joints.
- Check squareness by measuring both diagonals of the carcass or door frame from corner to corner. The difference between the two measurements should be within your specified limit.
Photo and video evidence checklist:
- Full-face photo of each door and drawer in closed position
- Close-up of the widest gap point (with feeler gauge in frame for reference)
- Straight-edge photo showing flushness at panel joins
- Diagonal measurement photo for squareness record
This evidence pack matters for pre-shipment sign-off and for resolving any disputes after delivery.
If you are defining tolerances for an upcoming project, our ready spec template helps you standardize QC, packaging, and inspection before production starts. Share your BOQ or category list, and we can help you build the right tolerance framework for your timeline.
Where Tolerance Failures Actually Come From
Most tolerance failures follow patterns. Understanding those patterns makes them preventable before production, not fixable after delivery. Without clearly defined tolerance standards in furniture joins, even well-made furniture can fail at the installation stage.
- Edge banding finish
- Hardware misalignment
- Moisture and humidity
- Packing stress and corner impacts
- Site handling and stacking
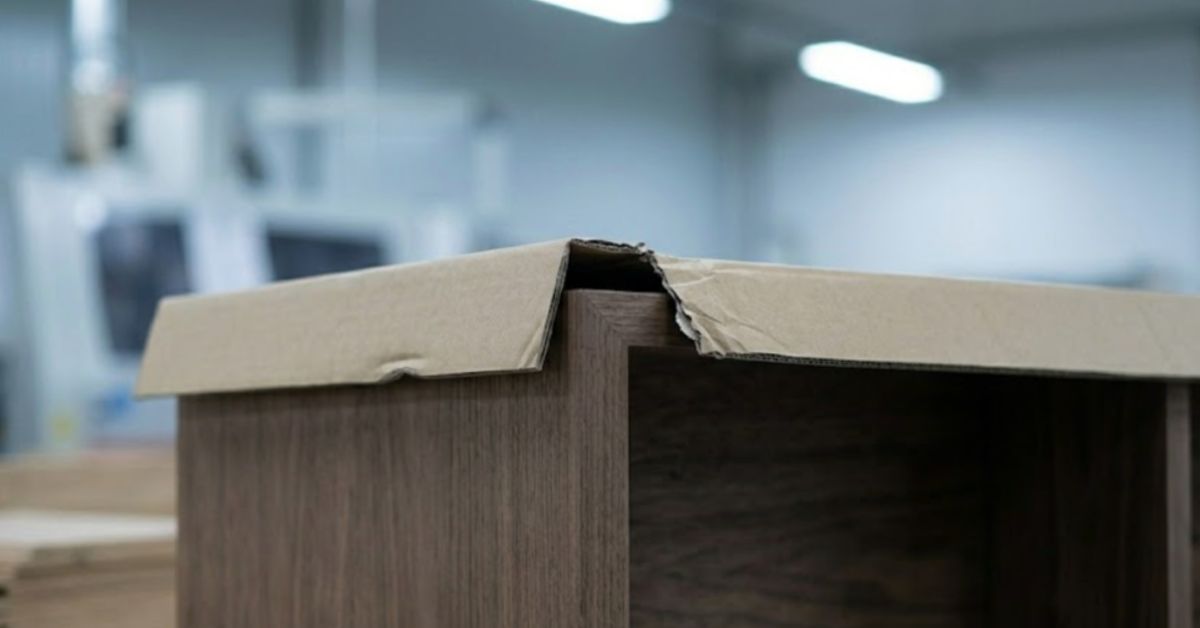
Poorly trimmed edge banding creates a visible lip at panel joins that reads as a flushness failure even when panels themselves are correctly assembled. This must be specified and checked separately from panel alignment.
Fix: spec edge banding + check at mid-production
Hinges and drawer runners drilled 0.5 mm off position translate directly into a visible gap inconsistency. One of the most common sources of uneven drawer reveals and door alignment problems.
Fix: hinge + runner check at mockup and mid-run
A piece that passes QC in a dry factory can show measurably different gap dimensions after a sea shipment through humid ports or arriving at a humid installation site. Material grade and moisture content limits must be specified.
Fix: moisture content spec + sealed packaging
Furniture not correctly packed for transit can arrive with carcasses racked out of square. The factory produced correct work, but incorrect packaging undid it. This is a spec and logistics failure, not a manufacturing failure.
Fix: packaging spec + corner protection standard
Improper stacking during receiving or installation can introduce warping or corner damage that opens joins. A receiving check on arrival, even basic sampling, catches this before it becomes a snag list item.
Fix: receiving check + stacking protocol on site
Where Tolerance Failures Show Up in Global Projects
Tolerance issues that never appeared in factory QC have a way of surfacing at installation, and the location matters a lot.
In UAE and KSA hospitality projects, problems frequently appear after sea shipments from South and Southeast Asia. Humidity variation during transit, multiple handling checkpoints at ports, and delays in climate-controlled storage all shift material dimensions between factory sign-off and site delivery. A gap that measured 2 mm at pre-shipment inspection can read as 3.5 mm on arrival.
Multi-vendor coordination adds another layer. When casegoods, upholstery, and loose furniture arrive from different factories on different shipments, alignment tolerances across adjacent modules become harder to control. Each factory signs off independently. Nobody owns the tolerance between them at installation.
For cross-border projects, the spec needs to account for this:
- Moisture content limits appropriate for the destination climate, not the factory location
- Sealed packaging with desiccant where sea freight is involved
- Pre-shipment inspection that includes a final tolerance check after packaging, not before
- A punch list/snag list protocol that references the agreed BOQ tolerance clause for faster resolution on site
We have supported hospitality procurement for projects across the GCC, and the projects with the fewest installation disputes are those where the tolerance spec travelled with the furniture, not just with the QC report.
Common Mistakes Buyers Make with Tolerance Specs
Most tolerance problems are not factory problems. They are spec problems. Here is where buyers consistently leave gaps:
- No variation limits defined. Specifying a gap of "2 mm" without a consistency limit means a run of doors with gaps ranging from 1.5 mm to 3.5 mm technically passes. It will not look like it does.
- No mockup sign-off. Tolerances agreed by email before production are worth very little without a physical reference sample that both sides have signed.
- No mid-production QC checkpoint. End-of-production inspection finds problems after the full batch is made. Mid-production catches them while the run is still correctable at low cost.
- No packaging spec. A piece that passes QC in the factory can fail at the installation site if packaging does not protect joins and corners during sea freight and port handling.
- Same tolerance applies everywhere. Guest-facing zones, standard zones, and back-of-house have different visibility and different cost implications. Treating them identically overspecifies where it does not matter and underspecifies where it does.
A structured contract manufacturing process addresses all five. Tolerances are written into the BOQ, locked at mockup, and verified at each production stage before the shipment moves.
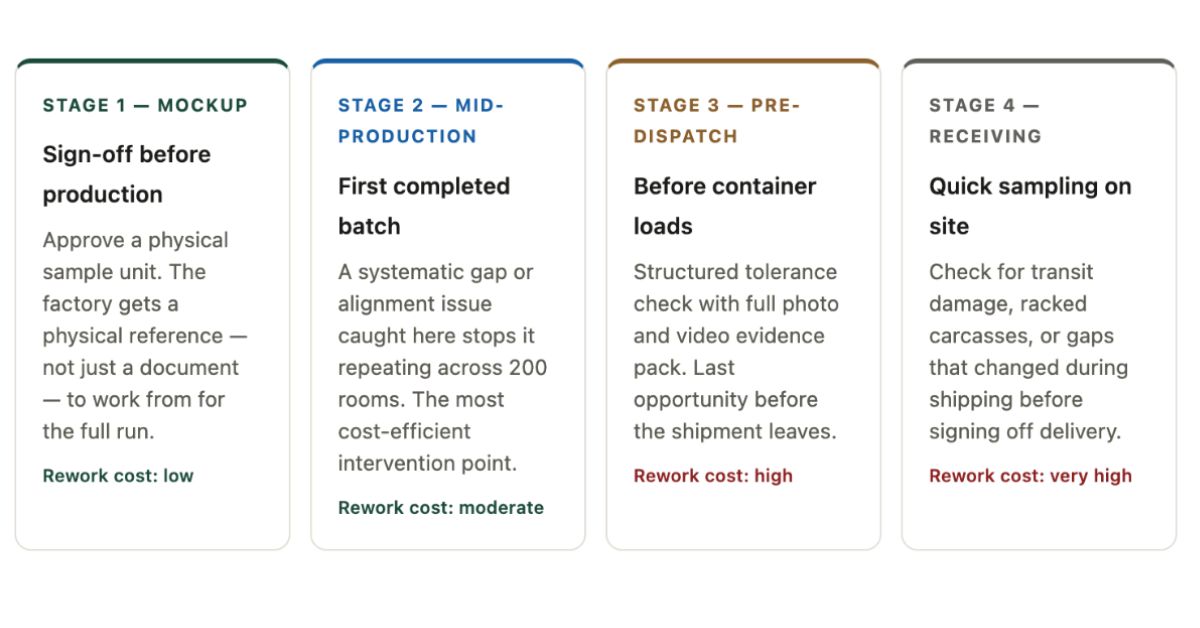
QC Checkpoints That Catch Join Issues Early
A single end-of-production QC check is too late. By that point, the full batch is made, and rework is expensive. A structured three-stage workflow catches problems when they are still cheap to fix.
Tolerance Spec You Can Paste into Your BOQ
Here is a ready-to-use tolerance clause format. Fill in your project values at the mockup sign-off stage.
FURNITURE JOIN TOLERANCE SPECIFICATION
Visible join reveal (door/drawer): ___ mm max consistent gap
Reveal consistency across unit: ___ mm max variation
Flushness step between panels: ___ mm max
Alignment across adjacent modules: ___ mm max over full run
Squareness (diagonal difference): ___ mm max
Edge banding overhang / trimming: Flush to ___ mm max
All tolerances to be verified at mockup sign-off, mid-production inspection, and pre-dispatch QC. Pass/fail evidence pack (photo + video) required before release for shipment.
Copy this into your BOQ or project spec sheet and add the agreed-upon values during mockup sign-off.
Struggling to lock tolerances before production starts? Arcedior supports procurement teams and project managers with structured sourcing, QC checkpoints, packaging spec, and pre-dispatch inspection coordination.
Closing: Spec First, Ship After
Tolerance standards in furniture joints are not complex. But they are specific. The projects that avoid snag lists and rework disputes are the ones that wrote the tolerances down early, signed off on a mockup, and verified at every stage before the furniture left the factory.
The spec does not need to be long. It needs to be clear, measurable, and agreed by everyone before production starts. One mockup sign-off and a three-stage QC structure will do more for your delivery quality than any amount of factory chasing after the fact.
FAQs
What are the tolerance standards in furniture joins?
Tolerance standards in furniture joins are defined by pass/fail limits for the visible gaps, flushness, alignment, and squareness where panels, doors, and drawers meet. They give factories a measurable target and give QC teams a clear basis to approve or reject work. Without them, pass/fail decisions become subjective, and disputes after delivery are almost impossible to resolve quickly.
What gap is acceptable in furniture joints?
A consistent reveal gap of 1.5 mm to 2.5 mm is the working benchmark for premium guest-facing furniture. The key factor is consistency across the same unit, not just the size of the gap.
- Premium / guest-facing: 1.5 – 2.5 mm consistent gap
- Standard: 2 – 3.5 mm
- Back-of-house: up to 4 mm
A gap that varies by 1.5 mm across the same door run looks worse than a gap that is 3 mm but perfectly even.
What is a good flushness tolerance between panels?
For premium finishes, a maximum step of 0.5 mm between adjacent panels is the accepted limit. For standard furniture, up to 1 mm is generally acceptable. Any step that catches light under normal viewing conditions is worth flagging at QC, especially in hotel guestrooms where lighting is directional.
- Premium / guest-facing: max 0.5 mm
- Standard: max 1 mm
- Back-of-house: max 1.5 mm
How do I check squareness in cabinets and casegoods?
Measure both diagonals of the carcass or frame from corner to corner. The difference between the two measurements is your squareness deviation. For premium casework, keep this within 1.5 mm. For standard, within 2.5 mm. Always do this check on a level surface.
- Premium casework: within 1.5 mm
- Standard: within 2.5 mm
- Back-of-house: within 3 mm
Why do drawer gaps look uneven after installation?
Uneven drawer gaps are usually caused by hardware misalignment during drilling, a racked carcass from shipping or site handling, or a drawer box that is not square. Check runner alignment first, then carcass squareness, then the drawer box itself. If all three look correct, check whether the carcass is sitting plumb and level on site.
Should I define different tolerances for premium vs standard furniture?
Yes, always. Guest-facing zones in hospitality projects (guestrooms, lobbies, reception) warrant tighter limits than back-of-house or storage areas. Applying the same tolerance to everything either overspecifies cheap areas, adding unnecessary cost, or underspecifies premium ones, which is where snag lists come from.
How do humidity and shipping affect join tolerances?
Wood-based panels expand and contract with humidity changes. A piece that passes QC in a dry factory can show measurably different gap dimensions after a sea shipment through humid ports or arriving at a humid installation site. Specifying correct material grade, moisture content limits, and sealed packaging in your BOQ reduces this risk significantly.
What tools do I need to measure joint tolerances?
A feeler gauge set, a straight edge (600 mm minimum), a combination square, a tape measure, and good directional lighting cover the basics. Calipers help with precise edge banding checks. None of these are expensive, but they need to be used consistently across every unit inspected.
When should tolerances be checked, mockup or final QC?
Both, plus mid-production. Mockup sign-off is where tolerances are confirmed as achievable. Mid-production catches systematic errors while the run is still in progress. Pre-dispatch QC is the last checkpoint before the shipment leaves the factory. A single end-of-production inspection is too late to prevent costly rework.
How do I handle tolerance failures, rework, or reject?
At the mockup stage, failures mean rework and re-approval before production runs; this is low cost and expected. At pre-dispatch, the decision depends on whether the issue is cosmetic or structural, whether it can be field-corrected, and whether it affects guest-facing surfaces. Having a pre-agreed tolerance clause in your BOQ makes this conversation faster and far less contentious.